Thursday, June 30, 2011

Canada Day Fabric Yo-Yo Doily

I am on a quest to streamline my fabric scraps into three boxes, and this little Canada Day decorating project helped get rid of some in style. Do you have some fabric scraps you need to diminish? How about making fabric yo-yo doilies? I am thinking I might make one for a bunch of different occasions.
1. I made 16 yo yo's starting with 6"diameter circles. 
2. Line up the yo-yo's how you want them to be placed. Sew them in groups of four, then sew the groups of four together. I sewed about a 3/4" long stitch when sewing them together. 
Wouldn't this be really cool with the American Flag colors? I am picturing stars and stripes here.
Put a favorite centerpiece on it and you have a sweet patriotic centerpiece. 

Thanks for stopping by!

Linking up to...


Tuesday, June 28, 2011

Love Pillows - Wedding Gift Idea


I like to give original gifts for special occasions like weddings. I have seen pillows around blog land that have spelled "LOVE" and thought that would be a unique gift. You could just buy pillow cases and transfer the letters on - but I decided to make everything from scratch. These pillows are more like throw pillows and I didn't want the opening on the side like most pillow cases - so I made envelope slip cover pillow cases. Here is what I did....

1. Purchase pillows. To make a pillow case pattern I found a pillow case that fit the pillows, turned it inside out and cut out two front pieces from pre-washed fabric. My fabric was a cotton/poly blend. My front pieces measured 27 inches x 21 inches BUT PILLOWS ARE DIFFERENT so that might not be the same measurement to use for the pillows you purchase. I printed out the letters using a free font called "Vanessa" (I had a few possible fonts I was going to use but the name of this font was the name of the bride so I thought that was cool). I printed them out the biggest they could fit on a page - the L and V are capitals, the o and e are lower case. I used one transfer per letter - so in other words, one letter should fill a whole 8 1/2 x 11 page. Remember to reverse the image. I used Jolee's Transfer paper that I purchased at Michael's.

2. Iron on the transfer using the package directions.

3. Cut two back pieces per pillow - making sure you have enough fabric to overlap one of the sides. Check out my envelope slip cover tutorial for more information. My measurements for each back piece was 16 inches x 21 inches - Remember - every pillow is different so do your own measuring. I finished each inner edge, folded it over 2 inches and sewing that secured. I layed the back pieces over the letter piece - right sides together - or in other words,  the letters will be on the inside and the non-seam side of the back will be on the inside. Sew all the way around the pillow, sewing an extra stitch at the opening so it will be durable for taking the pillow in and out.

4. Put in the pillows - and you have a fabulous gift. Oh yeah, I bought some other throw pillows to match that were the wedding colors. I could have sewn them BUT I found some at a price that I couldn't have made them for less.

Thanks for stopping by!

linked up to...

Tip Junkie handmade projectslil luna link party button

Monday, June 27, 2011

Matchbook Sewing Kit Tutorial


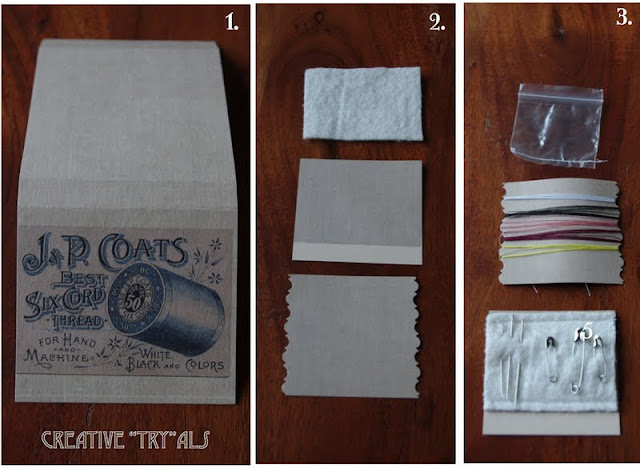
I needed a little sewing kit for a gift basket I was putting together and this is what I came up with. The vintage sewing clipart is from Graphics Fairy. I made my image 2 inches x 2 1/2 inches. I printed it out on cardstock and cut it at a 6 inch length and the width of the image (2 1/2 inches) - making sure there was 3/8 of an inch below the image to leave room for securing the matchbook closed.


1. Once your matchbook cardstock is cut out (6 inches long 2 1/2 inches wide with 3/8 below the image) you need to score lengthwise at 2 1/2 inches, 2 7/8 inches and 5 1/2 inches. Once folded you should be able to see the matchbook shape.

2. Cut out two pieces of cardstock 2 1/2 inches x 2 1/2 inches. Cut one of the pieces with decorative scissors for the thread card. Cut a piece of felt that is 1 7/8" height and 2 1/2" width.

3. Wind different colors of thread around the decorative cut cardstock, starting and finishing on the back to keep it neat on the front. Sew the felt on to the other cardstock. Add sewing pins and safety pins. Cut a mini zipper bag the height of the cardstock pages. Sew the bottom closed. This will be for buttons. Add the buttons to the bag after you staple the book together.

4. Place cards and empty button bag neatly on top of each other. Align and center the stack resting them on the bottom fold of the matchbook. 

5. Making sure all the layers of the stack are against the bottom fold, staple the bottom flap - close to the bottom of the matchbook as you need room to secure the cover - and centered on the matchbook. 


You can ink the cardstock if you like or leave it as is. Mine has been lightly inked.
And there you have it - a sweet little sewing kit.

Thanks for stopping by!
Linking to...

Tip Junkie handmade projectslil luna link party button

Thursday, June 23, 2011

Breakfast Pizza Recipe


This is what I made for Father's Day brunch this year - breakfast pizza. A totally new concept for me, (putting eggs on a pizza) but it was really good and my hubby LOVED it.  Here is how I made it....

I whipped up a batch of my Quick Rising Flax Pizza Dough.


I rolled this out to a thin crust, and baked it in the oven for 5 minutes before putting on the toppings. Poke the crust in numerous places with a fork before baking to prevent air pockets. With the dough I was able to make two large pizza crusts and one 8x8 pan pizza crust, but I only made one breakfast pizza (the other two I did cream cheese and chicken topping - I will post that recipe another time - so yummy).

On the one pizza crust I put the following toppings....

-Prepared hollandaise sauce from a Knorr classic sauce packet (I didn't quite put all of it on).
- Johnsonville mild sausage, cooked and drained
- 6 eggs, scrambled and cooked
- onions (I used red onion but you can use whatever one you have on hand)
- red pepper
- Tex Mex cheese to sparingly cover

Cook the pizza at 425 degrees for 15 minutes or until crust is slightly browned, and toppings are cooked to your liking.

Thanks for stopping by!

Linking up to...


Tuesday, June 21, 2011

Love at Home Chalkboard


I made this for part of a wedding present. I repurposed a bulletin board that I bought at a thrift store for $1 - into a cute little chalkboard. Here is what I did....


1. I sanded all the wood including bulletin board wood. I painted the frame with four coats of white acrylic paint - sanding lightly between coats. I painted half the board white - and the other half with chalkboard spray paint. This was the first time I used chalkboard paint. The directions said to apply at least two coats, I applied six - sanding lightly between coats. I wasn't expecting to do that many coats but  it didn't look like a chalkboard until the sixth coat. Maybe my coats were too light?? Oh well, live and learn.

2. My original idea for the letters was to buy wood letters and paint them white. I could not find wood letters that fit and that had all the letters - so plan B - I decided to make chipboard letters. I printed out 4 pieces of each word/letter/symbol on card stock, and mod podged them together. I printed these words out from my Cricut using three different cartridges. "Love" -  Home Decor cartridge (size 3 1/2); "Home"  - Home Accents cartridge (size 3 1/2); "@" Graphically Speaking (size 2). The number "2" picture looks wonky - but it is showing what I cut out before I them together.

3. After the letters dried - the next step was to glue them on to the board.

4. I was in a bit of a hurry to finish this project and hot glued the letters to the board - however I suggest giving yourself plenty of time and sticking the words on with tacky glue. Some of the hot glue on mine oozed out and was visible.

5. I made a chalkboard brush using a 1x4 scrap, that I painted, stamped a scroll on top, and glued felt to the bottom.


I think it turned out pretty nice, and that chalkboard brush just made me giddy - it was so cute. I am on the hunt for another bulletin board to make one for myself now. 
Thanks for stopping by!

Linking up to....

UndertheTableandDreaminglil luna link party button
Join  us Saturdays at tatertotsandjello.com for the weekend wrap 
 up           party!


Monday, June 20, 2011

Father's Day Scrapbook Page Idea


These are Father's Day pictures from 2010. I was looking online for some Father's Day picture ideas for this year and possible scrapbook ideas and I came across a slideshow of Father's Day scrapbooking ideas  on the Scrapbooks Etc website. With one of those pages being my inspirations I went to work. I printed the journaling, the date, and the "F" brand right on to the scrapbook paper. I used Dymofont for the other accents - printed them out on card stock and pasted them on the paper. This was a quick and easy scrapbook page that turned out pretty cool.

Linking up to...

Making

How to Make Custom Envelopes


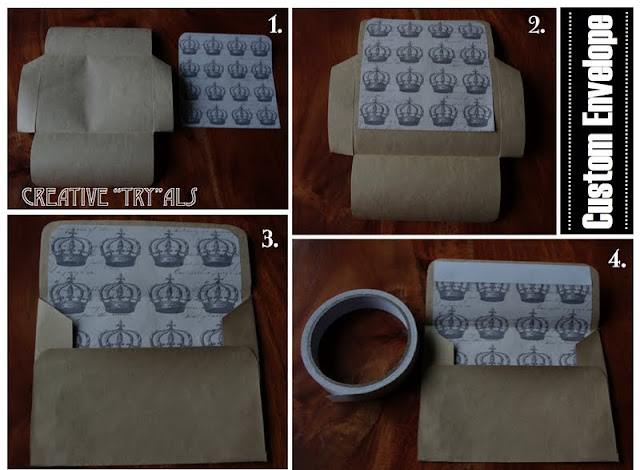
I ran out of envelopes on the weekend and needed an envelope for a Father's Day card. It was a perfect opportunity to make a custom envelope. I have also wanted to buy kraft envelopes but they are no where to be seen in the city I live in. With my kraft envelope desire in mind, I chose to use kraft wrapping paper - the stuff that is on a roll that you can use for wrapping packages for the mail. I took a used envelope for my pattern.

The paper dimensions for this envelope are 7 1/4 x 9 3/4 inches. This fit an A2 card - which is a 4 1/4 x 5 1/2 inch card (half an 8 1/2 x 11)
1. I scored at 3/4 of an inch on both short sides for the side tabs - and at 2 1/4 " and 6 3/4 in on the long side. Cut the top and bottom rectangles out to make the side tabs.
2. Cut a contrasting piece of paper to decorate the inside of the envelope, a little more narrow than the envelope. I printed out digital paper called
  Old World Crowns and Script from Background Fairy. I rounded the corners of the insert paper, along with the top and bottom flaps on the envelope. I also cut the top of the tabs at an angle. Glue the insert to the top on the envelope.
3. Glue the bottom envelope to the side tabs.
4. Cut a piece of double sided tape and place at the top of the envelope where you want it to be sealed. Don't take off take cover until you are ready to seal the envelope. *Just a note* - I used pretty wide double sided tape. This proved to be difficult to open the envelope - so next time I will either cut the width of the tape in half or I will cut the tape into three one inch pieces and place at both sides and the middle.

With the leftover pieces of paper - I made bag toppers for some bags of peanuts.

I am so excited to have found a way to have kraft envelopes that are a fraction of the cost - and also to customize envelopes to go with the cards I make. Hopefully this gives you some ideas too!
Thanks for stopping by!

Linking up to...

Friday, June 17, 2011

Truckloads of Love - Card for Dad


Masculine cards are a hard one for me to wrap my brain around - so when I saw this card (CLICK HERE) - I had to make it. I couldn't find a direct link to this card on the blog - but I went to "Created by JB" - there are oodles of beautiful cards on there - so well worth your time in checking this blog out. 

I cut out the labels, trucks and heart on my Cricut. The labels were from "preserves", the truck from "New Arrival" and the heart from Jubilee Celebrations. 

Check out my Dad's Day page for other Father's Day ideas.
Thanks for stopping by!

Linking up to....


Thursday, June 16, 2011

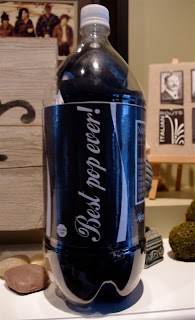
Best Pop Ever - Father's Day Gift Wrap Idea


I saw this pop bottle gift idea in a recycling book a few months ago, and I knew I had to make this for my hubby! This is an emptied 2 liter pop bottle, filled with goodies. It all came together when I found the most awesome label on the
She covered a pop can with this fabulous label she made.  I printed out the largest one I could print on my printer - and had to print out another one to fill in the gaps as it didn't quite fit around the bottle - but the width was the perfect size. 

Check this label out - it is so clever!

So here is how to make this pop bottle into a gift bottle... 


1. Clean an empty 2 liter bottle.
2. Take an exacto knife and make a slit in the plastic - the width of the label.
3. Fill the bottle with goodies. The goodies need to be sort of flat to successfully get in the bottle without any injuries - I filled it with socks, gum, licorice, peanuts, and a gift card. 

4. Glue or tape on your label.
5. To make the label shiny and look like it is all one piece - cover it with clear shelving paper. 


And there you have it - a unique low calorie Father's Day gift!

Check out my Dad's Day page for other Father's Day ideas.

Thanks for stopping by!
Linking up to....

Party Button

Wednesday, June 15, 2011

Shirt and Tie Goodie Bag For Dad


Every year at church, the women provide a little something for the men on Father's Day. I saw all the cute little shirt and tie bags made out of lunch bags on blogs- but I didn't want the goodie bags to be that big. I also wanted a white shirt - so I came up with the white little sandwich bag idea.


I bought these bags at a wholesale store - they came in a case of 1000. Let's just say I am stocked for life - but there are so many crafts one can make with these little beauties. For the ties, I cut out a tie shape to fit the bag, and found some scrapbook paper that had neat patterns. This is a good way to use up  outdated paper, or paper from slabs that you had no idea what to do with it. These goodie bags are simple and perfect for mass production. We made 80 of these. Here is how you do it....

1. Start with a paper sandwich bag. 
2. Fold the top over (approximately 2 inches - depending on what you put in the bag).
3. Cut out the collar. 
4. Staple on a tie. We used two staples to hold each collar down. 


These bags are so adorable - I can't wait to give them out on Father's Day.
Check out my Dad's Day page for other Father's Day ideas!!
Thanks for stopping by!

Photobucket

Linking to...

lil luna link party button