Wednesday, September 28, 2016

Heat Transfer Christmas Wood Sign with Heat Transfer Tips


Hello! Welcome to my blog! I love trying new things, and this creative tryal is one that I am glad that I tried. I had wood burned transferred a smaller projects before (see my plant stick post here), but I loved this saying that I had seen around and thought this would be a good test for a bigger heat transfer project.

My husband made the wood background for me. They were 1x4's cut in 12 inch slats and glued and stapled together with a power staple gun using smaller wood slats to staple into at the back. I prepared the wood by aging it with a vinegar and steel wool mixture. Then I did a light white wash. I sanded the edges for a nice worn, manger/stable look.

I made the saying on my favourite publishing program. 


 I reversed the image so it would transfer the correct way on the wood. Next I had to get a laser copy of the words as an inkjet transfer would not work. I have read about how to do an inkjet transfer, but I am too lazy to do the work to make it a success.


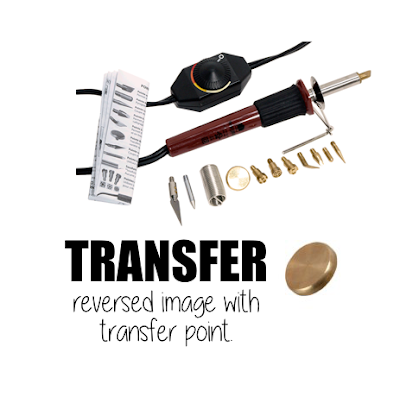
 The next step was to heat transfer. I used a wood burning kit I purchased from Michael's with the transfer point.

Here are some things I learned while making this project about 20 times:

-  add some pressure . I tried transferring sitting down and it might sound crazy, but it didn't transfer as well. When I stood up it worked better.
patience. It will take about 15- 20 minutes for a nice transfer and this is a small sign.  I counted to three slowly in each spot I was transferring - checked how it adhered to the wood and did it again if it was not dark enough.
do a test burn- I heated my tool for 10 minutes then I put it on my project and my paper nearly lit on fire and it burned a nice circle on my project. Have a scrap piece of wood and paper close by to test the burn. It releases some of the heat and then you can carry on.
outline the words on the back of the paper with pencil - on bigger projects like this, put your paper on a window or a light box and outline the lettering so you can see where you need to heat transfer.
repeat transfer if necessary - this is related to the patience tip:  if the lettering is not dark, apply heat to the lettering again. I taped my sheet to the wood in a manner that it was secure, but also so I could flip the paper up to see how well the letters were transferring. If it was not dark enough I would reapply heat. On one of my first signs I had it on display for a couple days and realized some of the letters were not dark enough. I took the original paper and lined up the letters and heat transferred again. There is a lot of ink on the laser photocopy.
avoid knotted wood where words need to be - I love knots. It adds to the rugged look of a wood piece; however, if you have a knot where a word needs to be transferred on it will not work. The knot is dark brown and the lettering is black.

This was a wonderful and fulfilling project! Just think of the possibilities of what can be heat transferred on to wood....Why don't you give it a try?

Saturday, September 17, 2016

Light and Life - Christmas Printable and Card


Hello! Welcome to my blog! Since Christmas is a few months away, it is about time that I post some projects that I made last year that I did not have time to post before Christmas. Instead of a photo family card last year I made a regular card. I seen a poster online and I liked the idea of it for a card (when I find it again I will link to it).


I printed the image I made on kraft card stock. I fit four to a page. After cutting the images, I adhered glue to the circle area, plus a few dots in one corner and stamped a star. I sprinkled glitter generously to the page and let dry over night. After tapping off the excess glitter I adhered the glittered image with pop dots to a craft card that had a cream background paper previously attached to it. A simple to do card with a beautiful effect. The image is free to use for personal use. Click on the above image, save and copy to your favourite publishing program.
Thanks for stopping by!

Saturday, July 23, 2016

Home Sweet Home - Marriage Survival Kit


Hello! Welcome to my blog! Here is my latest marriage survival kit. It is similar to my "Happiness is Homemade" kit which also includes a bunch of kitchen items, this one does not have the sayings that rhyme. This is what I put in it:


I purchased all the items from Home Sense. I loved the bright colors for a spring wedding shower. The tags are free for personal use. You can find them by clicking here.

I put all items in a bowl and attached the corresponding tag to each item.  I tied tulle around the bowl and attached an adorable little whisk. I usually tie the tag around the bowl, but with the which there I just placed it on top of the items. I also used to put a plastic bag around the kit but this time I left it open and I liked it better.

Thanks for stopping by!

Saturday, July 16, 2016

You Are Not Old, You are a Classic - Vintage Survival Kit


Hello! Welcome to my blog! My husband had a milestone birthday recently. I was not too hard on him. He got some useful items in a car themed birthday bucket. Here is what I put in the Vintage Survival Kit:


I put all the items in a wash bucket.

I love how the tags turned out. My husband is crazy about classic hot rods - especially Mustangs, so that had to be on the main tag. You can download the tags free for personal use only HERE.

Thanks for stopping by!


Friday, July 15, 2016

Luggage Refashion Tutorial

Hello and welcome to my blog! Boy have I been busy, busy, busy. I have a lot of projects to load on my blog from new survival kits, to suitcase refashioning to a wood burned ranch sign. I just love how my suitcases turned out. For my tutorial on how to refashion the outside of a suitcase, CLICK HERE. 
This is how I refashioned the inside of my suitcases....


I hope this gives you some inspiration! Happy creating!!

Tuesday, March 22, 2016

Reap What You Sow - Marriage Survival Kit


It is that time of year again - WEDDING SEASON! I have not had to organize a wedding yet, but a lot of my friends have - thus, I get to create a lot of wedding gifts. This couple had already been set up in there house so I needed to think beyond the kitchen and household items that are usually given. And so - the REAP WHAT YOU SOW marriage survival kit was invented. Here is what I put in the kit:

1. Don't get choked out with weeds - Garden Tools. I purchased mine at Canadian Tire but I also saw a similar set at Costco.

2. Work together, hand in hand - Garden gloves.

3. Plant your roots in fertile ground - potting mix.

4. Don't let your love wilt - watering can.

5. Cut out the dead wood to allow for new growth - pruning shears

6. Add the essential nutrients - Miracle Grow


Each tag has a corresponding quote which has a suggestion on strengthening marriage which relates to the title on the tag. I printed each set out on card stock. I put the quote tag behind the title tag.
You can find the pdf file for the tags HERE.


I purchased a large galvanized bucket from a Dollar Store and fastened burlap and lace around it to match the tags. 
Stay tuned for my next project - Home Sweet Home Marriage Survival Kit.
Thanks for stopping by!


Saturday, February 20, 2016

Mom Themed Explosion Box


I made some exploding boxes at Christmas (yet to be posted) and I have to admit, I am addicted. These are so much fun! Even putting simple things in them make them look impressive. 


To make the box all you need is a 12x12 sheet of card stock. Score  at 4" and 8". Turn the paper, and score again at 4"and 8". Cut out the four corners and there you have the box part.
The lid is from 6"x6" card stock and scored at 7/8" all sides. Cover the cardboard as desired.

.
This gift was for a baby shower. I am all about talking up the importance of a mother and this gift was part of that promoting. In the centre I pasted a small doily, and a small teddy bear that held a frame of a silhouette picture of a mom with her baby. I bought the mini frame, the flowers and the doilies from Michael's. I found the clip art online. 


Each side has a decoration. All silhouettes I found online. I searched, Mother silhouette and a good selection came up. I cut each one out as best I could. I adhered the silhouettes with pop dots.


 On one of the sides I added a pocket. I put some "mother" quotes inside the pocket.
All the quotes can be downloaded HERE with my free PDF for personal use.


The top of the box I decorated with lace, a circle punched pattern paper, lace tied in a knot and a flower glued over the knot and the banner quote.


I went to three showers this past month, and the mom's absolutely loved these. I have two more to make for upcoming showers. 

Thanks for stopping by!

Sunday, January 17, 2016

Relief Society Bulletin Board Idea


Welcome to my blog! With a new year upon us I thought it was time to freshen up our bulletin boards in Relief Society. I started with a blue cloth that was left at a Give and Take table we had. I painted on some darker blue acrylic paint to give it some spunk. The pictures of the bulletin board do not do it justice. The fabric looks rich and velvety.


We have a pouch for the newsletter and lesson outline schedule for the year. The border around the bulletin board is burlap ribbon I purchased at Michael's in the clearance section and I stapled lace over it. I was fortunate to have someone think of me when they were thinning out their sewing supplies and this lace was in that fantastic package. 


 The top portion of the bulletin board is a miniature gallery wall. The right corner has a round tin and I printed a Relief Society emblem to put in it. I inked the edges with brown ink to give it definition.
I had purchased a bunch of little clipboards years ago and thought they would be perfect for posters.
I added lace to each of the bottoms and tied lace and ribbon to the clips. I bought the middle "frame" from Michael's in the paper section. I inked the edges for dimension. Inside the frame is our Ward Relief Society focus for the year - united in the cause of Christ.


I made two embroidery hoop pictures to fill in the empty space. I found these at a second hand store for 25 cents. I printed off a banner, a triangle for the top of the house (with the same background paper I used for the banner) and a couple shapes with book page background for the house.
I sewed the edges and hot glued everything on the linen which is from a jacket I purchased dirt cheap at a second hand store. The heart I cut out of red felt. I tied two bows with jute and hot glued those on to give the impression the banner is tied with string.


We have two bulletin boards and the boards are pretty identical except that I made the embroidery hoop art a little different. 


One of my pet peeves about bulletin boards is how messy push pins are. I saw an idea HERE for a tin tart pin cushion and so I followed those directions to make my push pin holder. I had tart tins on hand that I found at a second hand store, again for next to nothing. I hot glued tacks to the bottom so I could pin them to the board. I had to fix one of the push pin holders after a week. My guess is someone took it off the board to see how it was made and accidentally ripped off three of the tacks. They have been up for almost a month now and I haven't had any other issues. 

Thanks for stopping by!